Electron with React
TL;DR
- 최근 사내부서에서 윈도우 데스크톱 제작 요청을 주었고 운이 좋게 개발을 맡게되었습니다. 기능이 많지는 않지만 React + Electron으로 윈도우 프로그램을 만들면서 알게된 몇가지 내용을 공유해보겠습니다.
What is Electron?
Electron is a framework for building desktop applications using JavaScript, HTML, and CSS. By embedding Chromium 🔗 and Node.js 🔗 into its binary, Electron allows you to maintain one JavaScript codebase and create cross-platform apps that work on Windows, macOS, and Linux — no native development experience required.
- 공식 홈페이지에서 발췌한 글로 Electron은 Javascript, HTML, CSS를 사용해서 데스크톱 애플리케이션을 구축할 수 있고, 바이너리에 Chromium, Node.js를 내장하고 있다는 것이 크로스 플랫폼이 지원되는 원리입니다.
프로젝트 구축
# vite-react-typescript 프로젝트 시작
pnpm create vite first-electron --template react-ts

# Electron 및 빌드 관련 패키지 추가
pnpm add -D electron electron-builder wait-on concurrently
어떻게 빌드되는가?
"scripts": {
	"dev": "vite",
    "lint": "eslint .",
    "preview": "vite preview",
    "electron": "wait-on http://localhost:5173 && electron .",
    "electron:dev": "concurrently "pnpm dev" "pnpm electron"",
    "electron:package": "tsc -b && vite build",
    "electron:build": "pnpm electron:package && electron-builder --win --x64 --config electron-builder.json"
},
"main": "./public/main.cjs",- ⭐️
pnpm electron:devpnpm electron:build pnpm electron:dev는 개발환경에서 사용하며, React 앱을 실행시킨 후 wait-on을 사용하여 local 서비스가 사용가능할때 까지 기다립니다. 이후 localhost:5173이 사용가능하다면 일렉트론을 실행시킵니다.pnpm electron:build는pnpm electron:package를 실행시켜 typescript와 vite 빌드를 순차적으로 진행합니다. 이후 electron-builder 패키지를 사용하여 target os 및 build config를 적용하여 electron build를 진행합니다.- main의 경로 설정도 매우 중요합니다. electron 애플리케이션의 진입점을 지정하는 역할을 하기에 정확한 경로 설정이 중요합니다.
- 빌드할 때 사용한 electron-builder.json의 내부입니다. 중요한 files와 win 필드에 대해서는 하단에 별도로 정리해보았습니다.
{
  // 앱의 고유 식별자, 보통 역방향 도메인 표기법을 사용합니다.
  "appId": "com.first-electron",
  // 애플리케이션의 이름입니다.
  "productName": "First Electron",
  // 빌드된 파일들이 저장될 디렉토리를 지정합니다.
  "directories": {
    "output": "build"
  },
  // electron 빌드에 필요한 파일들을 지정합니다.
  "files": ["dist/**/*", "node_modules/**/*", "public/**/*"],
  // windows 관련 설정입니다.
  "win": {
    "target": [
      {
        "target": "nsis",
        "arch": ["x64"]
      }
    ],
    "icon": "./public/icon.ico"
  },
  // windows 인스톨러 관련 설정입니다.
  "nsis": {
    // 설치 파일의 이름 형식
    "artifactName": "First_Electron_Installer.${ext}",
    // false로 설정하여 사용자 정의 옵션 설치 제공
    "oneClick": false,
    // true로 설정하여 사용자가 설치 경로 변경 가능
    "allowToChangeInstallationDirectory": true,
    // true로 설정하여 바탕화면 바로가기 생성
    "createDesktopShortcut": true,
    // true로 설정하여 시작 메뉴 바로가기 생성
    "createStartMenuShortcut": true,
    // 바로가기의 이름
    "shortcutName": "AdsKit Commander",
    // 제거 시 앱 데이터도 함께 삭제
    "deleteAppDataOnUninstall": true
  }
}- win필드는 windows 빌드 관련 세부설정을 정의합니다.
- target: 패키지 타입과 아키텍처를 지정합니다. 위에서는 Installer 형태의 패키지에 64비트 시스템을 지원하게 명시되어 있습니다. 이외에도 대표적인 패키지 타입에 nsis-web, portable이 있으며, 아키텍처에는 ia32(32비트), arm64(ARM 기반) 등이 있습니다.
- icon: windows 탐색기, 작업 표시줄 등에 표시될 아이콘의 경로를 입력합니다.
main.cjs에는 무엇이 있을까?
const { Menu, BrowserWindow, app } = require('electron');
const path = require('path');
require('./ipcHandler.cjs');

// public 폴더에 있는 preload.js를 위한 경로 설정
const preloadPath = path.join(__dirname, 'preload.cjs');

// 개발 환경에서 사용할 기본 URL입니다.
const BASE_URL = 'http://localhost:5173';
// app이 packaging(build)되었는지 확인해서 dev와 production을 구분합니다.
const isDev = !app.isPackaged;

// BrowserWindow 객체는 전역으로 관리합니다.
// 전역이 아닌 경우 자바스크립트 가비지 컬렉팅 발생 시 의도치 않게 browser window가 닫힐 수 있습니다.
let mainWindow = null;

const createWindow = () => {
  // 메뉴가 불필요하여 빈 메뉴로 설정 후 적용했습니다.
  Menu.setApplicationMenu(Menu.buildFromTemplate([]));

  // BrowserWindow 인스턴스를 생성하여 전역객체에 할당합니다.
  mainWindow = new BrowserWindow({
    // 가로 사이즈
    width: 800,
    // 세로 사이즈
    height: 600,
    // position
    center: true,
    // 사이즈 조절 유무
    resizable: false,
    webPreferences: {
      // 개발 도구(devTools) 사용 유무
      devTools: isDev,
      // Node.js 통합 비활성화 - 보안을 위해 렌더러 프로세스에서 Node.js API 직접 사용 방지
      nodeIntegration: false,
      // 컨텍스트 격리 활성화 - 메인 프로세스와 렌더러 프로세스의 실행 컨텍스트를 분리
      contextIsolation: true,
      // preload 스크립트 경로 - 안전하게 메인 프로세스와 렌더러 프로세스 간 통신을 설정
      preload: preloadPath,
      // 샌드박스 활성화 - 렌더러 프로세스의 샌드박스 모드 설정
      sandbox: true,
    },
  });

  if (isDev) {
    // vite로 실행된 localhost:5173의 index.html을 로드합니다.
    mainWindow.loadURL(BASE_URL);
    // devTools를 detach로 오픈합니다.
    mainWindow.webContents.openDevTools({ mode: 'detach' });
  } else {
    // react build 아티팩트의 index.html의 경로를 지정하여 해당 파일을 로드합니다.
    mainWindow.loadFile(`${app.getAppPath()}/dist/index.html`);
  }
};

// Electron이 준비되면 whenReady 메서드가 호출되어, 초기화 및 browser window를 생성
app.whenReady().then(() => {
  createWindow();

  // macOS에서는 창을 모두 닫아도 앱이 완전히 종료되지 않습니다.
  // 백그라운드에서 돌아가는 앱을 다시 Dock에서 클릭했을 때 activate 이벤트가 갑지되어 새창을 띄워줍니다.
  app.on('activate', () => {
    if (BrowserWindow.getAllWindows().length === 0) {
      createWindow();
    }
  });
});

// 모든 창을 닫는 이벤트가 탐지되면 앱을 종료시킵니다.
// 다만 macOS(darwin)에서는 창이 닫혀도 앱이 완전히 종료되지 않기 때문에 조건문 처리를 했습니다.
app.on('window-all-closed', () => {
  if (process.platform !== 'darwin') {
    app.quit();
  }
});
Renderer(React) Process와의 통신은 어떻게?
 위에서 보았던 preload.cjs 내부를 같이보면,
const { contextBridge, ipcRenderer } = require('electron');

contextBridge.exposeInMainWorld('electron', {
  invokePing: (text) => ipcRenderer.invoke('invoke-ping', { text }),
  onPing: (text) => ipcRenderer.on('on-ping', { text }),
});
임시로 invokePing과 onPing을 만들어두었습니다.
- contextBridge: 서로 다른 context를 가진 process(Main, Renderer) 사이의 다리 역할을 하는 API입니다.
- exposeInMainWorld: contextBridge의 메서드로 Renderer Process의 전역 스코프(window 객체)에 안전하게 API를 노출하는 역할을 합니다. 첫번째 인자는 window 객체에 노출될 속성 이름, 두번째 인자는 노출한 API들을 담은 객체입니다.
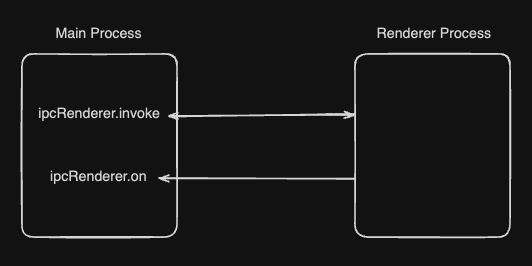
- ipcRenderer: Renderer Process에서 Main Process와 통신하기 위한 모듈입니다.
- invoke: Promise 기반의 비동기 통신이며, 요청-응답 패턴을 가지고 있습니다. 채널명과 handler에서 사용할 message를 인자로 받습니다.
- on: 응답이 없으며,이벤트 리스너 패턴을 가지고 있습니다. 모니터링 용도로 주로 사용됩니다. 채널명과 리스너를 인자로 받습니다.
contextBridge.exposeInMainWorld 메서드를 사용해서 invokePing과 onPing을 window 전역객체에 노출하였습니다. 하지만 typescript 상에서는 두 api에 대해서 타입 추론이 되지 않아 아래와 같이 새로 선언을 해주어야 타입 안정성이 높아집니다. 저의 경우 global.d.ts 파일을 생성하여 내부에 선언하였습니다.
export {};

declare global {
	interface Window {
    	electron: {
      		invokePing: (
        		text: string;
      		) => Promise<string>;
      		onPing: (
        		echoText: () => string;
      		) => void;
    	};
  	}
}
컴포넌트 내부에서 Main Process에 접근하여 Node.js API 사용이 가능합니다.
export default function Button() {
  const handleButtonClick = async () => {
    if (!window) return;
    const response = await window.electron.invokePing('ping');

    // expect "Received: ping"
    console.log(response);
  };
  return <button onClick={handleButtonClick}>ping</button>;
}
이제 “Received: ping”을 리턴하는 핸들러 구현이 필요합니다. 위의 ipcRenderer가 통신하기 위한 모듈이었다면, 통신을 처리하는 ipcMain 모듈을 사용해서 Renderer Process에서 온 요청을 처리해야 합니다.
ipcMain.handle('invoke-ping', (event, message) => {
  console.log('invokie-ping received from renderer.');

  const { text } = message;
  const response = `Received: ${text}`;

  return response;
});
처리할 handle에서도 ipcRenderer에서 인자로 입력했던 채널명과 동일하게 입력해준 뒤, 처리할 로직을 구현하면 되겠습니다. ipcRenderer를 app.whenReady().then() 내부에서 선언할수도 있겠지만 모듈화를 위해 저는 ipcRenderer.cjs라는 파일로 분리했고 또 handle 내부의 로직은 기능에 맞게 별도의 파일 로직으로 분류하여 사용 했습니다. event 객체는 공식 문서에 의하면 보안 검증, 창 관리, 요청 출처 확인 등 다양한 용도로 사용되나 저의 경우 필요가 없어 사용하지 않았습니다.
위의 설정이 통신을 위한 가장 컴팩트한 설정이라고 생각하며, 한번 따라해보시길 추천드립니다.
Conclusion
- 아직 코드서명 단계까지 진행하지 못해 비공식 경로로 배포를 하고 있는데, 코드서명까지 완료하여 정식 배포까지 완료해보고 싶습니다. 또한 말로만 듣던 Electron을 자주 사용하는 React와 접목해서 프로젝트를 개발한 경험은 기존의 웹 개발과 다른점이 많아 리프레시되는 좋은 경험 및 새로운 지식을 배울 수 있어 개발 경험이 좋았습니다. 이 글을 보고 작게나마 도움이 되셨으면 좋겠습니다.